

The LED board is replaceable and can be changed in a few simple steps. You can replace the LED board in a few simple steps. To purchase the LED Board Replacement Kit for the LF-Ledge Light, find an authorized FX Luminaire distributor near you using our interactive Distributor Lookup.
Important: Before ordering replacement parts, determine whether you have an old-style or new-style LF fixture, as the correct replacement components vary by version. Learn More
Conversion Chart (Use this chart when replacing the LED board in an original LF fixture)
| What color is the LED board? | What color is the Lens? | Parts Required | Description |
|---|---|---|---|
| Zoning: (Black LED board) | Amber | DKIT-1LED-W-LN-BD | 1 LED Linear Board, Horizontal Pins, 2700K, Zoning |
| LF-LA | Lens Assembly, Vertical Pins, Clear | ||
| Clear | 755906 | ZD 1 LED Linear Board, Horizontal Pins, 3900K, Zoning | |
| LF-LA | Lens Assembly, Vertical Pins, Clear | ||
| Zoning/Dimming: (Orange LED board) | Amber | DKIT-ZD-1LED-W-LN-BD | 1 LED Linear Board, Horizontal Pins, 2700K. Zoning and Dimming |
| LF-LA | Lens Assembly, Vertical Pins, Clear | ||
| Clear | 755906 | ZD 1 LED Linear Board, Horizontal Pins, 3900K, Zoning and Dimming | |
| LF-LA | Lens Assembly, Vertical Pins, Clear | ||
| Zoning/Dimming/Color: (White LED board) | Clear | DKIT-ZDC-1LED-RGBW-LN-BD | ZDC Linear Board, Horizontal Pins Zoning, Dimming, and Color |
| LF-LA | Lens Assembly, Vertical Pins, Clear |
Tools required include a #2 Phillips screwdriver, a 5/16-inch socket, a soft-edged pry device such as a small flathead screwdriver, and a pair of needle-nose pliers.

Turn off the fixture's power completely before disassembling.

The fixture has two acorn nuts attaching the brass housing to the mounting plate. Remove the two acorn nuts using a 5⁄16" socket wrench.

After carefully removing the brass housing and faceplate, you will now have access to the lens and socket of the LF fixture. Remove the two phillips screws from the lens.

Gently pry the lens away from the housing, being careful not to damage the O-ring behind the lens.

Note: This step only applies to the Version 1 LF fixture.
Remove the socket clip holding the socket in the housing with needle-nose pliers. Gently pull the socket from the housing.

The LED board can now be removed. Using a small soft-edged pry device, gently pry up on one side of the board. Make sure the base of the fixture where the LED was removed is clear of debris or residual thermal pad material.

Once the LED board is successfully removed, perform this procedure in reverse to reinstall the replacement LED board. Not all boards will fit in every fixture, so ensure the fixture can accommodate the selected board prior to maintenance. Also, remove any residue left on the fixture from the old LED board prior to installation of the new one. A pink-colored thermal pad is attached to the bottom of all FX Luminaire LED boards and should be left in place.
LF Generation Parts Overview: First Gen vs. Next Gen
| Generation | Parts | Description |
|---|---|---|
| LF First Gen |
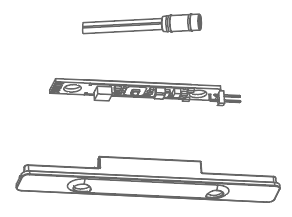
| Socket: Closed-contact design. LED Board: Vertical-pin configuration. Lens: Required changing the lens to achieve different color temperatures. |
| LF Next Gen |
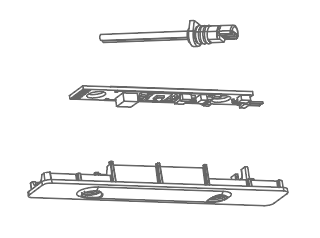
| Socket: Open-contact design for easier replacement. LED Board: Horizontal-pin configuration. Lens: Secures the LED board in place while providing electrical contact, enabling easier replacement. |
Still need help? We're here.
Tell us what you need support with and we'll find the best solution for you.